Showing posts with label home. Show all posts

Thursday, November 10, 2011

Painting to Fabric .. another Romero Britto

When one of my best friends, Blanka asked if I could somehow contribute to the gala evening benefiting Alzheimer's disease she is helping to organize, I immediately said "yes" ...  I am always the first to volunteer and last to realize how much work it will involve ... Oh oooohhhh

I promised to make a fabric "painting" similar to the one I made for my mom's apartment (see HERE) for the silent auction. I decided to make another Romero Britto painting called "Twist" (as in dance). The event will be attended by the dancing community, so I am hoping somebody will fall in love with this "fabting" as much as I did ...


It's not the original, but darn close to it and more unique ...
Plus, my guy is wearing trendier pants made from knitted print ;)


(Ok, this was my sales pitch for the silent auction for the ball this Friday) ... 

The process is exactly same as already described HERE ...
It's not hard at all and doesn't require much skill, just a whole lot of patience and sitting behind the sewing machine and the ironing board.
Below are a few progression photos. 


Shall we dance? 


Let's have fingers crossed the "fabting" will sell ...

"Fabting" - a word made up by LV for the lack of other words; A painting made from fabric; 
Also a fabulous thing ... Can you think of anything else?

Have a fabulous weekend everyone! Many more projects cooking. Stay tuned! 

LO(lo)V(i)E, LV 

Monday, October 17, 2011

Not another Halloween wreath?!

I know you've seen them all, but bear with me ok? This one is so easy you can make it with your eyes closed! ... hmmmm .. ok then One eye closed ... :)

Our apartment building is never decorated and I keep walking past these buildings with mums and skeletons, pumpkins and spider webs and then there is our entryway - empty and sad!

Well, this year I decided to change this ... 

I thought about making a wreath from little orange and black pom-poms, but that never happened because the craft store was out of foam wreath and the only one I could buy was the one from tree branches, which I like but none of my other wreath ideas worked with it. 

THEN I thought of my friend Bird's amazing printables! (This girl is so talented I am green with envy every single time she posts something new on her blog.) The only thing I wish she was making is printable clothing .. just imagine how much easier my morning routine would be, how much space we'd save in our NYC closets and how my hubby would be freed from any shopping for clothes duties - we'd cut them out in front of the TV watching the JETS ... LOL

Well, this is what I came up with at the end using Bird's Halloween collection .... 


No, it's not a bicycle decoration, but the glass on the door made it impossible to take a good photo and I didn't want to sneak around the neighborhood hanging my wreath on other people's doors ... 


I will be using the printables also for our "Boo at LoLo's" party this weekend so stay tuned ... 
There is still time to get your scissors (I mean hands) on these printables HERE.

LO(lo)V(i)E to all ... LV

Tuesday, October 11, 2011

Bringing home the pumpkin patch

Seven seasonals you may not know about me (us): 

1. I own a pair of orange pants (the same exact color as those pumpkins below ... 
uhmm not a surprise? :)
2. London's favorite Hungarian word is "orange", which is also probably one of the most difficult Hungarian words to pronounce "narancssarga" 
3. When I was a little girl my grandma used to bake pumpkins for me and I never liked them.  
Ever since I moved to the US I bake pumpkins every year, so that I can relive many of my childhood memories that remind me of her. 
4. I love pumpkin spice latte despite of the fact, that the flavor has probably more to do with some artificial flavoring than the pumpkin itself ...  
5.  I would love to get lost "for real" in a corn maze (preferably not alone and not in the dark :)
6.  Though it seemed romantic at the time of our wedding photos, rolling in hay is really, really really not a good idea
7. I would love to bake a pumpkin pie .. Anybody with an easy recipe?


Last weekend we took LoLo to a pumpkin patch and apple picking in NJ ... 


After a wonderful day spent with nana and papa, I decided to bring the pumpkin patch home. 

LoLo had these two pullies full of building blocks that they never used. The building blocks ended up in some toy bin and the wooden trays (one from Ikea for 7.99 USD - I have their older version and another one from Target) just kept taking up space ... I've been experimenting with Mod Podge (decoupage glue and sealer) lately and so I decided to mod podge the pulley ...
The process is easy ... clean the surface of your object, put a layer of mod podge on the object, spray water onto your paper so it's just damp, put the paper carefully on the tray and smooth. Let it dry and repeat the top layer of MP as many times as desired. (I did two layers). See the last photo? I bought the rolling tool at Michael's and it's an absolute must if you are going to mod podge anything or everything just what I am doing these days ... 


Our toddler group is having a Halloween party, 
and I think I will make cupcakes and serve it on this tray ... 


Check out the tutorial for the acorns HERE if you'd like to spend a night sewing these little buggers :) 


Did you get scared? :))))

Boo, LV


Saturday, August 27, 2011

Paint a picture with fabric or Romero Britto in cotton

A long time ago I found a picture of a painting in some magazine and loved it so much I tore it out and carried it in my wallet. It was a colorful painting of a boy reading a book ...


I knew I could not copy it on canvas, as my painting skills remain at a level of a house, a flower and a snowman, but thought I could reproduce it in fabric somehow. Years later I watched the show of Bethenny Frankel, when I saw the painting she gifted to her husband to be and new immediately it was by the same artist. As I found out, the painter is Romero Britto and all his paintings are virtually painted for those like me - color lovers with zero ability to paint but love of fabrics. 

I decided to make one of his works for my mom's birthday and chose this one  ... 


I uploaded the photo saved of the internet to BLOCKPOSTERS.COM and made sure it will print in a size I want. Once printed, I cut off the sides of the pages to make the poster and sealed it together with a clear tape ...


Afterwards, I cut up the poster to trillion little pieces. Be careful here, because you have to add the black line to either one of the bordering pieces and once in a puzzle form, it gets a bit hectic! Being this my first puzzle painting I cut up the entire poster at once, but I suggest you go step by step - bottom to top to avoid spending hours googly eyed figuring out where each piece belongs as I did ... 

I sorted the pieces by color and by pattern and rummaged through my fabric stash to pick and choose the fabrics. I had to buy many quarters, as I wasn't able to find the pattern I liked or the one that would match. As you see, the vase rests on two different patterns as a base. You will need the most of these two fabric. I chose a blue and black polka dot and a grayish blue flowery kind for the base. 
I measured the size of the poster and cut these fabrics to coordinate the size of painting I wanted. 

And now the most tedious part ... piece by piece I ironed a two sided heat-and-bond to the fabric, I used my puzzle piece to trace the shape and cut it out. 


Look at this chaos ...


Trying to figure it all out without a headache ....


The fun part ... putting it all together one ironed press at a time ... 

YAY .. almost ready ... 


 Lastly, just zigzag through the entire thing line by line by line as in any applique, sew sides to it so it can be stretched to a wooden frame ....

HAPPY belated BIRTHDAY MOMMY!


I am so thrilled the way it turned out, I can't wait to start our bedroom picture ... 
Which one shall I do???

Kisses????? 

Or "Tonight"????


Lo(Lo)V(i)E to you all from Slovakia, 

LV

P.S. Will post the painting hanging on mom's wall, but still waiting for a gentle-man to hang it for us ... 

Thursday, August 4, 2011

T-shirt pillow - my new obsession

Yupp, so easy to make, a great gift to give and so cozy to cuddle with :) 
I bought them at my favorite dollar store for 2.99 USD a while ago.
Three, to be exact. 
One with I HEART NY 
Another with something something in blue ink NY
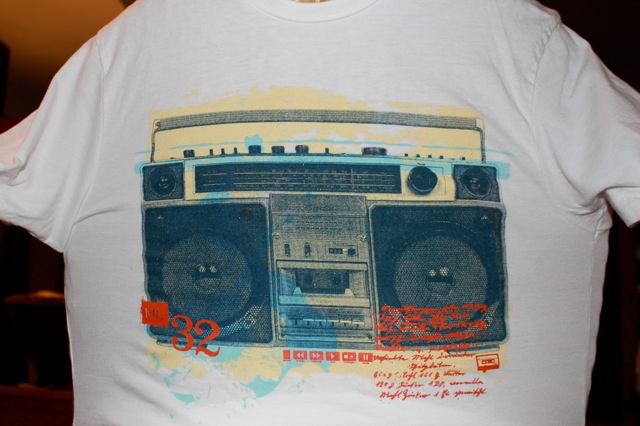
And yet another one, my favorite with a vintage boom box print ... Here it is stretched over our rattan dining chair ... You didn't really want to see me wearing a shapeless white t-shirt did you? 


Cut, cut, cut and cut the four sides ... Sew it together leaving some space for the pillow insert bought for 1.99 USD at Ikea (while husband makes remarks on how he doesn't understand the point of many pillows, because you really just need ONE single one and how from now on he'll have to spend half an hour just taking off all the pillows from our bed before he can actually fall into it and sleep .. and so on and so on ... blah blah blah ... :) If you know of a man, who actually likes pillows (I mean many, many pillows) please send him my way, I'll make him my poster child for this post (pun intended :)  


Once ready, all I had to do was take a picture of it, which turned out to be a longer project in itself than making the pillow. I love all things pretty and can dress myself all right (I think), but when it comes to styling a photo it gives me headaches and I just can not understand how all those crafty girls and boys do it for their blogs? Do you have a house full of props and backgrounds or what's the secret?
Can somebody please advise? ... Otherwise you're stuck with this .... 
(I really wanted to get all sorts of tapes and make a messy suitcase with them and my boom box, but could not find a single tape?!!! in the house ... ) 


And here is a bit of trivia: 
I got my first boom box when I was 14 years old. The day we could travel across the Austrian border from Czechoslovakia for the first time, my mom called me at a boarding school and ordered me home saying: "We are going to see what's it like to be rich!". We waited endless hours on a bus with other people going to see "The West" for the first time and spent a day window shopping (we could not afford or believe the prices) around Vienna. I remember admiring the Christmas decoration and being stunned that despite of the fact, that it wasn't bolted to the ground or had a watchman over it, nobody was stealing it :) - something that would not be imaginable in our part of the world ... 
We then boarded the bus again in dark and travelled to the outskirts of the city, where we got dropped off somewhere at a local supermarket.  I've never seen a supermarket before with endless isles of food, clothes, shoes, paper goods, housewares .. you name it ... etc. I can't recall the name of it, but thinking back it must have been a Wallmart sort of place, though at that time it felt more to me like Dior on 5th Avenue would today (that is if I ever dared to enter). Mom sad I could have one expensive thing from the store (additionally to my favorite pack of gummy bears that were luxurious goods at the time). I finally chose a long, black Panasonic stereo with green turning buttons and it was my most valuable possession for a very long time .... 


 See how times change? 
Now I wouldn't trade my new pillow stereo for the Panasonic if you paid me for it :)))

LO(lo)V(i)E to you all, 
LV

Have you also made a t-shirt pillow? Send me a link, please I would love to post your pillows here, just to see all the varieties (ok, and props :).
 And regarding those "other" t-shirts ... the NYC is still work in progress, 
the other one on the waiting list ... 

Also on Link Party here:


Wednesday, April 6, 2011

Trash to wall

Let's see what went wrong today ... Well, the contractor didn't show up as agreed upon for the SECOND time, my camera fell on the floor right before taking photos of my latest project (below) thus blurring my entire world aaaaand I got peed on by London, which wouldn't have been that bad if it wasn't for my favorite jeans I was going to wear out. At the end of the day, one learns the skill of directing a tiny boa constrictor only by experience and experiment and I still haven't figured it all out ...

Oh and my "Brother" and I are also having issues as the upper thread keeps breaking and I keep threading and re-threading the machine, cleaning it inside out and reading the manual front to back. Do you sense how much my world has shrunk sans a functioning sewing machine and a camera that needs begging, lots of TLC and magic to take a photo at all? My world is so limited, that I actually proceeded with a project I've been putting aside since we've lived here - our photo gallery wall in the bedroom!

When we moved to Brooklyn, I dreamt of a feature wall behind the bed with retro wallpaper and raised flower pattern. I knew wallpaper can get expensive, but how much really can a single wall cost in a rather small room? Well, 800 USD as it turns out! Appalled by the price, I collected all the  "throw away" picture frames, put them on the floor, played around a little bit arranging them and finally arrived at what we now have.

It is hard to find good photos and going with the "budget theme", I went to a few fancy paper stores, bought wrapping paper and here is what came out of it ... Paintings! :)))


Added a few photos ... This one is by my friend, a well-known Czech photographer Jiri Turek
And yes, it's Prague ... 


An old, ooold photograph of my grandma in a play. She is standing in the middle row right next to the King. She was an actress in the village's volunteer theater and I just find it so glamorous, I had to place her right above the bed (though her being herself RIP, she would surely disapprove and would want to be switched for a cross ... ) 


And here is my newest 5 minute project that took me three years! A shadow box bought for 5 USD at Ikea, a butterfly hole puncher, scrap paper and glue dots ...  Introducing: The most unique butterfly collection in the world that any lepidopterologist would envy! (Don't be impressed by the word - I just googled it myself :) Ooops one butterfly got away ...


The entire collage ... I keep wanting to put a black and white photo in the middle of the green field ...  


And the wall with one frame still missing that special photo or something else ... Also notice the smooching couple on the upper right corner! Cute huh? I LoLoVe detail!  


   Hope you got inspired! Don't forget to LO(lo)V(i)E each other, LV

P.S. For more inspiring wall galleries visit The Inspired Room.
See my gallery featured again if you have the desire to at #119

Look what another creative pair of hands made using a paper punch:
Visit whipperberry for a quick and easy tutorial ... So beautiful!


HAVE YOU MADE A PROJECT USING CRAFT PUNCHES?
IF YOU ANSWERED "YES" OR "MAYBE", PLEASE LINK YOUR POST BELOW.

Sunday, March 27, 2011

Spring wreath

It's been a long, no looooonnggg winter and I am not happy about it! I want to hear birds chirping, I want to feel the warm rays of the sun and flip flop around the city in big bug sunglasses and flirty dresses. Around this time every year, a feeling sets in that Spring and Summer were cancelled forever. As I kept looking at the forecast for this week hopelessly seeing rain/snow on the computer screen, I realized that "If the mountain won't come to Muhammad, Muhammad must go to the mountain." So, I brought a piece of Spring and sunshine into our home and didn't even need to move a mountain (only a sewing machine out of my bedside table, a cutting mat from underneath the carpet, a few scraps from the coffee table and bar chair to reach the nail in the wall :o) 

You'll need: 
A wreath 
Happy fabric 
Burlap 
Ribbon
Paper/color printer 
Most importantly: A glue GUN!


1. Gather your materials 
2. Here is my favorite technique: let's call it W&G meaning "Wrap and Glue" ... So let's start ... W&G, W&G, W&G till the end with 2 inches wide burlap strips ....  


3. These are the happy fabrics I picked out. I cut strips 10-12 inches wide with different length, anything measuring 58-70 inches long. 
4. Iron them in half 
5. Draw waves going up to the middle and then down again and around. 
6. Sew through the waves and the bottom, leaving an opening to turn the piece inside out. Make sure to mark the waves on the inside of the fabric. Once done, cut around the waves close to the drawn/sewn line. 


7. Once turned inside-out gather the fabric by hand and twist to a rose shape while sewing the "snake" at the bottom. 
8. A bunch of flowers glued on.

Don't you LO(lo)V(i)E it? 


Forgot to mention: Print out a Happy Spring Banner! Mine is not very sophisticated (made in picnik.com), so if you are a graphic designer, feel free to take it up a notch from this very immature design. Print it on landscape (enlarge it to the length of the paper), punch two holes on each side and tie it to the wreath.  

If you like what you see, here is my banner: 


And the wreath's home next to our friend, the sleeping Buddha.


LO(lo)V(i)E

 Elvi