It's going to be a Thanksgiving baby and I am so thrilled for her and the entire family. Ever since she told me the great news I kept thinking what gift I would make for the baby and finally decided to make something I've only seen in the US - a diaper cake. The idea of a diaper cake doesn't really excite me to be honest, but anything that looks like something and hides something else (like a good bottle of wine) does :)
Sooooo .. I bought a bottle of Chilean vine (Kerma is Chilean), a box of size 1 diapers (they grow out way too fast from size 0) and a few items all penguin related as Kerma loves penguins and so will the baby (I guess :)
The penguin items (from top to bottom) are: a penguin onsie rolled up, a book about a penguin, a wash mitten with a little orange hook for the bathroom and a stuffed overweight penguin :)
What else do you need?
- A box of size 1 diapers (I used 56 Pampers)
- A bunch of rubber bands
- A tray (I bought this one from Party City - you can find trays of any color here)
- Clear tape (Double sided works better, but I didn't have it, so I improvised)
- Tissue paper (2 sheets per layer)
- Paper for decorating (I used wrapping paper also bought at Party City)
- Ribbon (The wire kind makes prettier bows, but you can use any kind)
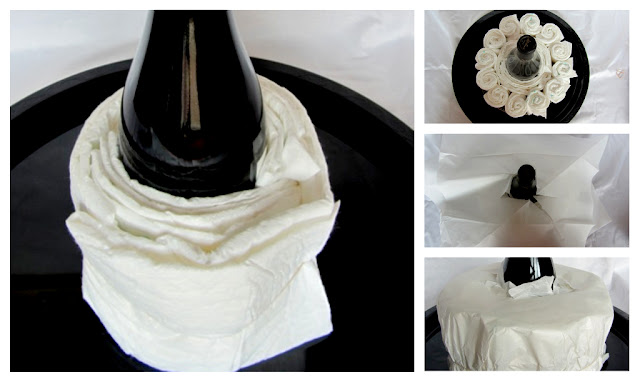
- Make a bunch of little diaper rolls. Put 2 together (upside down), roll and tighten with a rubber band
- Wrap your bottle around with loose diapers
- Place your rolls around the bottle
- Take two sheets of tissue paper, cut a hole just big enough for the bottle's neck to go through in the middle and pull on your first layer of tissue paper
- Smooth the paper down, put rubber band over the entire layer and tuck below. Don't be discouraged if your cake at this stage looks like a pile of poop (pun intended) .. it will get better, I promise .. just keep those diapers rolling and placing them on top of each other
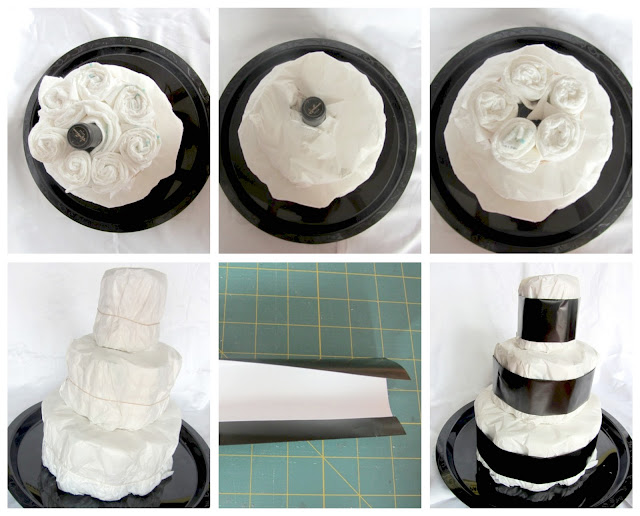
6. Follow the same process on layer 2
7. Second layer tuck-tuck is a bit trickier, but once the rubber band is in place it will start to shape up
8. Proceed the same way onto layer 3, but depending on the shape of your bottle and how many diapers you rolled around the center you may want to make your rolls just singles, as I did ...
9. Ouuu Ammm Geeee ... see what an ugly cake??? (I almost gave up at this stage and thought it will look ridiculous and I will have to really bake a cake instead ... )
10. Cut your wrapping paper - I cut 6 inch wide strips and folded them on the top inside ...
11. See? Looks a bit better with the black around the layers, doesn't it? You can use glue dots to attach the black layer or a double sided tape or just fold a single sided tape and pretend it's double and attach that way ...
12. Tie your ribbon around, make the cutest possible bows and attach any gift items you want to with a tape. (The sticky will wash out don't worry ... )
All done!
And here is Kermita holding her cake ....
If you are in NYC and would like a cake - this one or a similar one, or have a theme, but not a soul to make the cake for you and you really, really don't feel like rolling paper diapers in your free time
(I understand :) drop me an email: lolovienyc@gmail.com .....
Lots of warm, fuzzy, cuddly penguin hugs and LO(lo)V(i)E
LV


